Table of Contents
Intro
Languages have always been fascinating to me. My Greek immigrant father had a lot of opportunities to learn different languages when he was younger. When I was a kid, I always thought that picking up another language would be easy because of how naturally it came to him…but it’s not. Like really, it’s not.
I took Spanish for four years in high school and thought I was pretty hot stuff until I went to live in Mexico for a couple of years. I was constantly put to shame when five year olds corrected my grammar daily. I quickly learned a language requires immersion and daily commitment. Fast-forward to the last year of my undergrad. In my user interface design class I was assigned a project where I could make whatever app I wanted as long as its result would push me out of my comfort zone and I only spent 10 hours making it. Because I am a glutton for punishment and had already started teaching myself Greek, I thought making some sort of immersive experience that would force me to practice my Greek daily would be the perfect fit. Et voila! The Lingo Lock was born.
Requirements
If you’re feeling ambitious and want to follow along, you might want to brush up on some skills. To make this program (script), you will require a little knowledge of the following:
- Python
- Bash scripting
- Duolingo API
- Urwid
lingo_lock.py
The main technical components of this script are dealing with the Urwid TUI library and interfacing with the Duolingo API. The original code for this script also allows for communication with an ESP32 connected to an indicator light (yes a little extra, I know). For the purposes of this summary we will ignore that and focus on the functional parts of the lock screen.
Urwid
Probably the funnest part about this project (for me at least) is the whole retro, minimalist appeal. As you’ve probably noticed if you clicked on the link for it above, Urwid is a TUI library as opposed to a GUI library. What are all these acronyms you ask? GUI stands for Graphical User Interface. If we want to make a program with point and click functionality, we will need to use a library that includes the GUI components in our script. On the other hand TUI stands for Terminal User Interface. This means that everything graphical will be text based and run in the terminal instead of running on the desktop with the more familiar point-and-click. Urwid is my library of choice for implementing TUI interfaces.
To begin using Urwid, you’ll need to download it using from pypi using pip:
$ pip install urwid
Once that has finished, you are now ready to start making all the nerdy, retro TUI programs in Python till your heart’s content! To get started with making our lock screen, we’ll need to import Urwid, create a style palette, and create a few lists.
import urwid
palette = [
('owl_art', '', '', '', 'g27', '#bff199'),
('title_style', '', '', '', 'black,bold', '#bff199'),
('bg', '', '', '', '#fff', '#071108'),
]
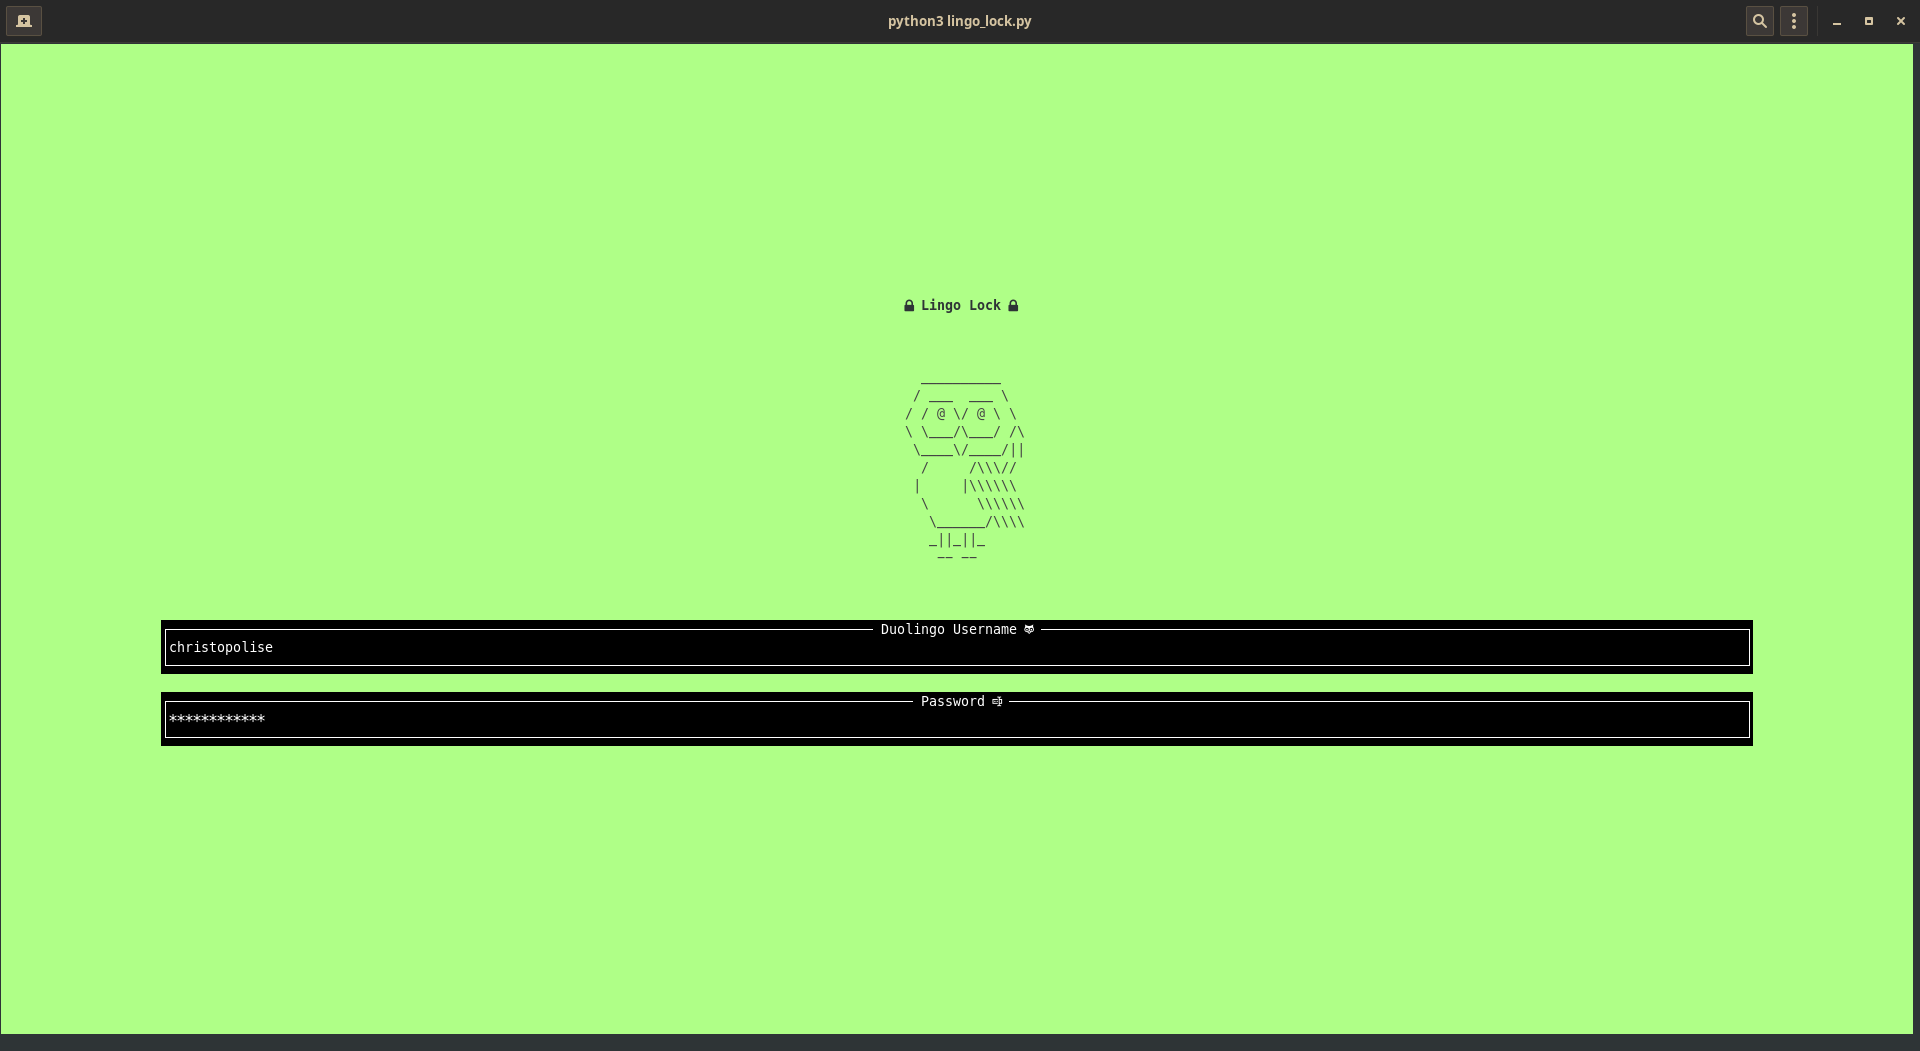
owl = [
" __________",
" / ___ ___ \\",
"/ / @ \/ @ \ \\",
" \ \___/\___/ /\\",
" \____\/____/||",
" / /\\\\\//",
" | |\\\\\\\\\\\\",
" \ \\\\\\\\\\\\",
" \______/\\\\\\\\",
"_||_||_",
"-- --"
]
owl_txt = []
question_widgets = []
The palette will allow us to easily define a color scheme across the TUI by defining certain styles. For example, the owl_art style uses the defaults for the first three values in the color palette by using '' and then defines custom colors on the last two values by putting in either a value that it either a grayscale, hex, or predefined color string. For more info about color palettes check out this tutorial.
We then will take some time to create some child classes that inherit from standard Urwid objects. Sounds scary no? This turns out to be deceptively easy in Python.
We create an object called UserBox that inherits from a pre-existing widget in Urwid. The parameter inside the parentheses when declaring the new class is the object we are inheriting from (in this case a LineBox). When we define a function inside this new modified object, it is either a new function or redefinition of one that exists in the parent class. (For more info on this practice, also known as overriding the function, take a look at this tutorial) In this case we are not adding any extra functionality and are practically creating a function that does exactly what the parent function in LineBox does.
class UserBox(urwid.LineBox):
    def keypress(self, size, key):
        global username
        """
        Takes the size and key and processes the key press
        """
        return super(UserBox, self).keypress(size, key)
Now that we have a basic grasp on inheritance and overriding, lets do something a little more involved. With PasswdBox (yep we’re inheriting from LineBox again) we will do something interesting with our text. In our keypress function we pass in some of the original parameters of the keypress function for LineBox; we take in the key press. Let’s make sure that a specific action is executed when we press Enter. According to the code below we will assign our global variable passwd to the LineBox’s text and then run a function to login to Duolingo (which we will define in the next section).
class PasswdBox(urwid.LineBox):
    def keypress(self, size, key):
        global passwd
        """
        Takes the size and key and processes the key press
        """

        # If the message isn't submitted keep typing
        if key != "enter":
            return super(PasswdBox, self).keypress(size, key)

        passwd = self.original_widget.get_edit_text()
        login_duolingo()
Following the same logic, we will make another custom widget that will store the answer that we give our login screen. This function, once the Enter key is pressed, will send the text of the box to a soon to be defined function which will verify with Duolingo that our answer to the proposed question is correct. As you can probably guess, once the translation is correct, we will signal for Urwid to end the program, else we will retrieve another word to be quizzed on from Duolingo.
class AnswerBox(urwid.LineBox):
    def keypress(self, size, key):
        global word
        """
        Takes the size and key and processes the key press
        """

        # If the message isn't submitted keep typing
        if key != 'enter':
            return super(AnswerBox, self).keypress(size, key)

        if checkTranslation(self.original_widget.get_edit_text()):
            raise urwid.ExitMainLoop()
        else:
             getWord()
Because this is a summary and not a comprehensive tutorial about Urwid, I will glaze over a lot of the details about what each function does in this next snippet. Suffice it to say, this code encapsulates all of the widgets we have made and a few new ones into a nice looking screen. Note how to control the style of a lot of these elements, the styles defined in the palette we made above are included as parameters for the widgets.
# Title and spacer
owl_txt.append(urwid.AttrWrap(urwid.Text(" Lingo Lock ", 'center'), 'title_style'))
for i in range(3):
owl_txt.append(urwid.AttrWrap(urwid.Divider(), 'title_style'))
for line in owl:
owl_txt.append(urwid.AttrWrap(urwid.Text(line, 'center'), 'owl_art'))
for i in range(3):
owl_txt.append(urwid.AttrWrap(urwid.Divider(), 'title_style'))
owl_txt.append(urwid.AttrWrap(UserBox(urwid.Edit(), 'Duolingo Username '), 'bg'))
owl_txt.append(urwid.AttrWrap(urwid.Divider(), 'title_style'))
owl_txt.append(urwid.AttrWrap(PasswdBox(urwid.Edit(mask="*"), 'Password ﳳ'), 'bg'))
owl_txt.append(urwid.AttrWrap(urwid.Divider(), 'title_style'))
owl_txt.append(urwid.AttrWrap(urwid.Text("", 'center'), 'title_style'))
pile = urwid.Pile(owl_txt)
fill = urwid.AttrWrap(urwid.Filler(pile), 'owl_art')
pad = urwid.AttrWrap(urwid.Padding(fill, 'center', right=20, left=20), 'owl_art')
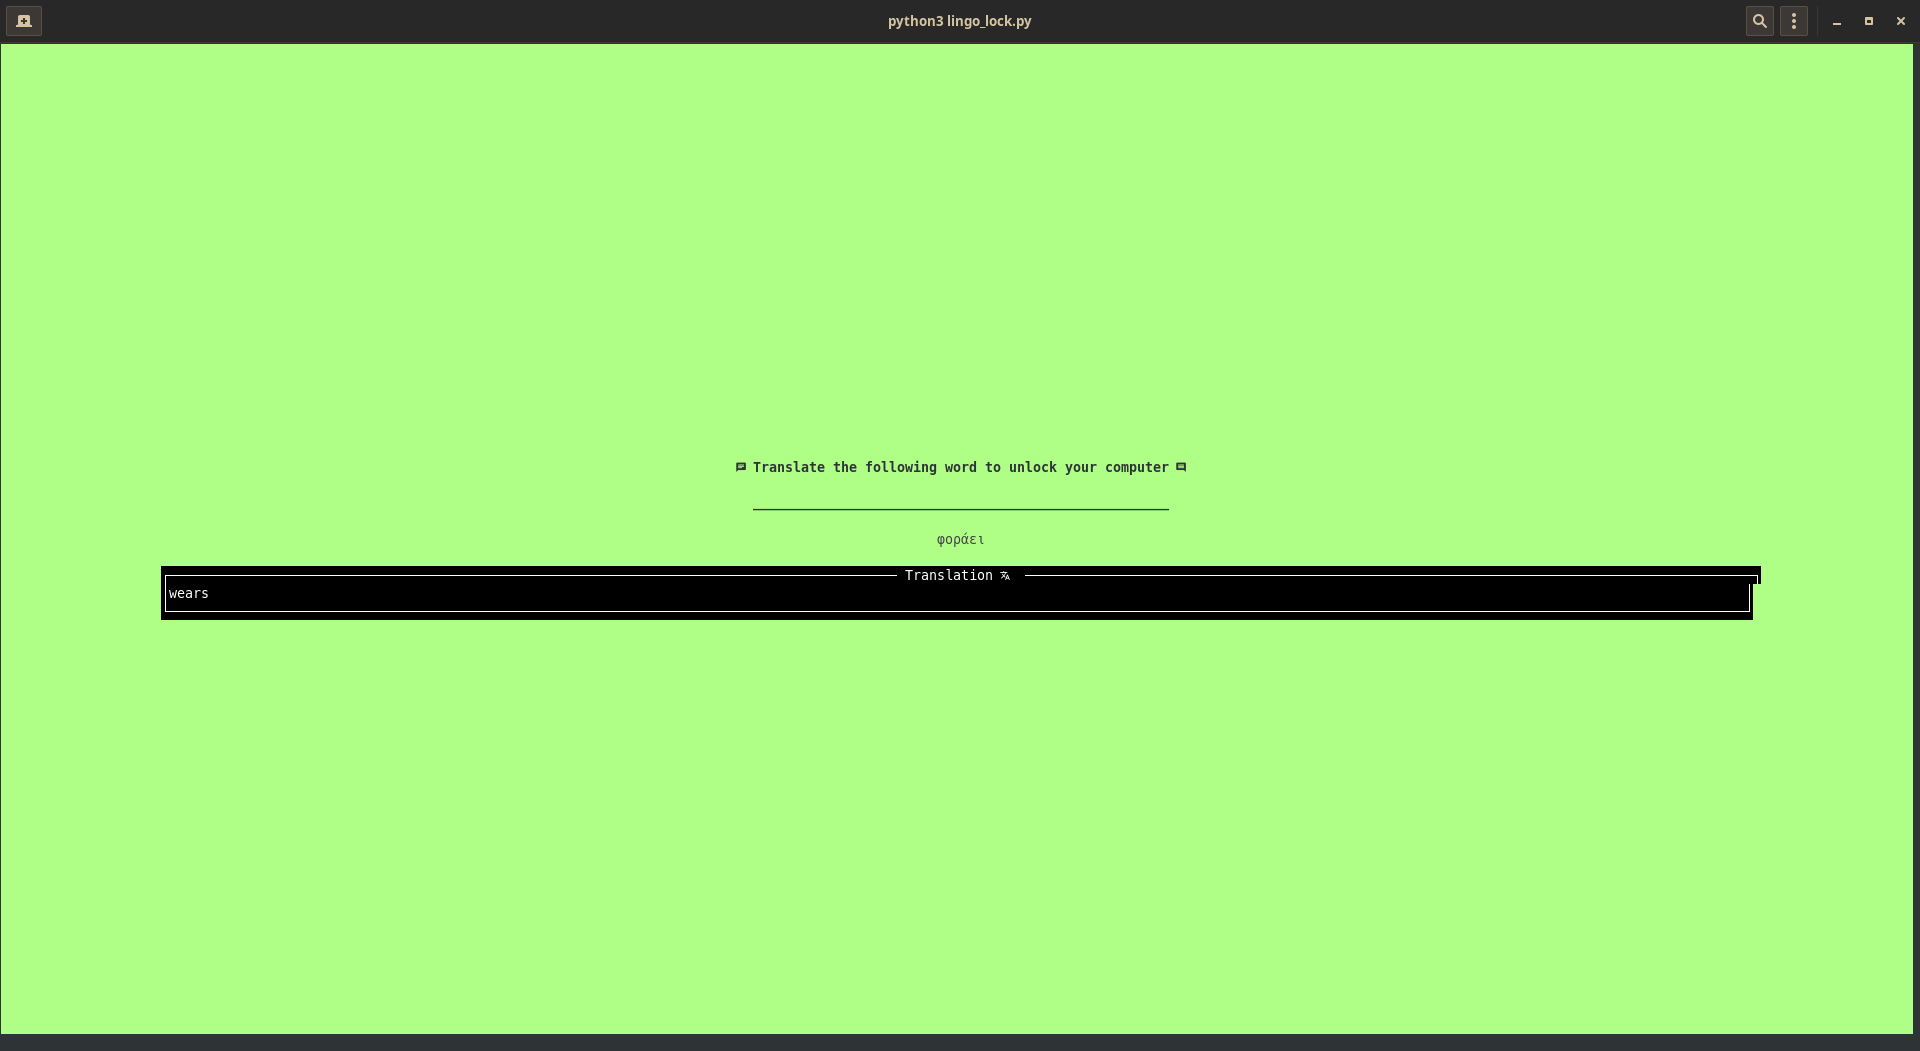
question_widgets.append(urwid.AttrWrap(urwid.Text(" Translate the following word to unlock your computer ", 'center'),'title_style'))
question_widgets.append(urwid.AttrWrap(urwid.Divider(), 'title_style'))
question_widgets.append(urwid.AttrWrap(urwid.Text("____________________________________________________", 'center'),'title_style'))
question_widgets.append(urwid.AttrWrap(urwid.Divider(), 'title_style'))
question_widgets.append(urwid.AttrWrap(urwid.Text("", 'center'),'owl_art'))
question_widgets.append(urwid.AttrWrap(urwid.Divider(), 'title_style'))
question_widgets.append(urwid.AttrWrap(AnswerBox(urwid.Edit(), 'Translation 韛'), 'bg'))
quest_pile = urwid.Pile(question_widgets)
At last we come to the fun part, actually making the code run. (Note: if you are following along, there are some functions like getWord(), checkTranslation(), and others). With loop we define the MainLoop of the TUI program, or the object that actually represents the interface and makes it run. We denote which child class we want it to show (pad being the largest encapsulating box of all the widgets we made and organized in the last snippet) and also our color palette definition. Then we set the colors to 256 bit so that we ensure that our program will be as pretty as we think it is and so that our terminal emulator won’t downgrade it and make it uglier. Finally, we make the main() function where we tell our loop to actually run.
loop = urwid.MainLoop(
    pad,
    palette,
)
loop.screen.set_terminal_properties(colors=256)

def main():

    # Safely terminates the program on Ctrl+C
    signal.signal(signal.SIGINT, signal.SIG_IGN)

    loop.run()
Duolingo API
The Duolingo API provides a number of functions that allow us to access a specific user’s information and progress inside their registered courses. The few functions we will be using in this application are for logging in so we can access our data, getting a known word from our learned word repository, and getting that word’s translation. We split each of these functionalities into their own appropriate function which will accomplish the needed API task and then will also update the TUI accordingly.
Let’s start with our login_duolingo() function which is called after entering submitting our password in the TUI. We’ll use the Duolingo constructor which requires both a username and password which we got using the get_edit_text() function and the global variable for the password. The try catch loop allows us to catch the instance of a bad login and create the necessary indicators in the TUI to prompt the user to re-enter this information.
def login_duolingo():
global username, passwd, lingo
try:
owl_txt[len(owl_txt) - 1].set_text("Checking credentials ")
loop.draw_screen()
lingo = duolingo.Duolingo(owl_txt[len(owl_txt) - 5].original_widget._original_widget.get_edit_text(), passwd)
# r = get(url=URL + "/login_success")
getWord()
except duolingo.DuolingoException:
# r = get(url=URL + "/login_fail")
owl_txt[len(owl_txt) - 1].set_text("Incorrect Credentials")
owl_txt[len(owl_txt) - 3].original_widget._original_widget.set_edit_text("")
passwd = ""
owl_txt[len(owl_txt) - 5].original_widget._original_widget.set_edit_text("")
username = ""
loop.draw_screen()
If our login is correct, the Duolingo object is initialized correctly and we can the use get_known_words function to retrieve a question for the user. We encapsulate the function into our getWord function which makes use of Duolingo’s API to query which words the user actually knows. Then we set the appropriate widgets in the Urwid interface to display the word and update the screen.
def getWord():
    global lingo, word

    word = ""

    while len(word) < 5:
        word = lingo.get_known_words('el')[randrange(len(lingo.get_known_words('el')))]

    question_widgets[len(question_widgets) - 3].original_widget.set_text(word)
    question_widgets[len(question_widgets) - 1].original_widget._original_widget.set_edit_text("")
    pad.original_widget._set_original_widget(urwid.Filler(quest_pile))
    loop.draw_screen()
When the user hits Enter in the answer box, the function checkTranslation() is run. This function takes the word selected by the getWord() function and uses a Duolingo function called get_translations() (which returns a list of possible translations for a selected word in English) and checks to see if the user_input is found in the list of possible translations. If the word is found, the checkTranslation() function returns true else false.
def checkTranslation(user_input):
    global word, check
    check = lingo.get_translations([user_input], source='en', target='el')

    for item in check[user_input]:
        try:
            num = item.index('(')
        except ValueError:
            num = -1
        if num != -1:
            if word == item[0:(item.index('(') - 1)]:
                return True
        else:
            if word == item:
                return True

    return False
As you can probably tell, a lot of this is only lightly covered in regards to explanation of code and etc. If you would like to see the whole project in its functioning form, feel free to take a look here. With everything working, this Python script should run on its own just fine.
lock.sh
Now that you have a shiny new Lingo Lock program, you are probably thinking to yourself, “What’s so special about this? I still have to run the program manually if I want to be quizzed! Where’s the lock part of this whole lock screen?” The secret sauce to actually locking down the computer is found in the lock.sh script. It’s here I have to throw out a caveat for this summary. When I developed this script, I was working on Ubuntu using the GNOME desktop environment. If this last confuses you and you’re not sure what either of those are, it is here that I must admit that this summary will probably functionally useful. You will have to find your own way through your OS’s particular way to disable escape keys etc in order to make this program truly function like a lock. If you are familiar with desktop environments and Unix-based distributions but still are not using GNOME on Ubuntu, don’t lose hope! The odds are that the adjustments you need to make are not super extensive and you can still try to get this to work. Either way, you’ve been warned.
The Script
While trying to emulate a lockscreen, there are several things we want to make sure we do:
- Make sure that this program is running whenever we boot up our computer. We won’t go over the specifics of that here, but in most modern desktop environments on Linux, this is as simple as using the indicated tool such as GNOME Tweaks.
- We need a trigger to run the lock screen in the event that the desktop enviroment detects that we are trying to unlock our computer.
- We need to run Lingo Lock.
- We need to disable any keys that would allow for the subversion of the unlocking process.
To address each of these concerns we will do the following:
- To make the program run on login, we will use the GNOME Tweaks tool, go to Startup applications, and add our
lock.shscript to the list of applications. See this tutorial if you need a walkthrough. - We will use the
dbus-monitorprogram to detect an unlocking event in GNOME. By ORing this program and its appropriate flags, we can cause the followingwhileloop to run whenever the computer is unlocked. - In the
whilestatement, we see there is a true and false flag set for whether the computer is going into a locked state, when it is coming out of this locked state (i.e “boolean false”), we will run our program using theevalcommand, choosing a terminal emulator to run the program in full screen with no scrollbar. - Lastly we will use
xmodmapto disable the various keys that would prevent the illusion of a lockscreen (i.e Alt, Super,etc). Note that after the execution oflingo_lock.pythe normal keypress capabilities are reinstituted so that they are functional after using the unlock screen.
#!/bin/bash

path_to_prog='/home/christopolise/CS_456/playing_around'

dbus-monitor --session "type='signal',interface='org.gnome.ScreenSaver'" |
  while read x; do
    case "$x" in
      *"boolean true"*) continue;;
      *"boolean false"*) eval $(gnome-terminal --full-screen --window-with-profile=NoScrollbar -- bash -c "gsettings set org.gnome.mutter overlay-key ''; xmodmap -e 'keycode 64='; xmodmap -e 'keycode 108='; source ${path_to_prog}/play_env/bin/activate; python3 ${path_to_prog}/lingo_lock.py; gsettings set org.gnome.mutter overlay-key 'Super_L'; xmodmap -e 'keycode 64=Alt_L'; xmodmap -e 'keycode 108=Alt_R';");;
    esac
  done
Final Thoughts
For me, this project was definitely a fun exercise in thinking outside of the box. While this is certainly not the most straightforward or easy way to make a lock screen, it does have its advantages! We learned a cool new library in TUI programming, had fun interfacing with a pre-existing API for Duolingo in unexpected ways, and proved that some projects are fun in concept but not in use 😉. After using the Lingo Lock for about a week, I decided that it was about as useful as shouting random vocabulary into the void. In addition to that, this is a whole added process to logging into your computer. It is guaranteed to make sure you turn off the auto-sleep setting rather than reviewing your language.
Along with these practical drawbacks are some technical ones as well. This application in its current state relies on a fullscreen, locked-down terminal window, which is fine if you are using one screen. However, the illusion of a hardened login screen dies the moment you have another monitor connected to your setup and you realize that there is a whole other window with which you can interact. I really enjoyed making this project and using it as an exploratory outlet, but I think that it will be a while before you see something similar popping up in a package manager or app store near you.